For this project I used...
a box
photo printed on a white paper and cut to size
Photo Transfer decoupage
Brayer and Squeegee
Sponge with a little bit of water
decoupage or any other top coat to seal
Mod melter
Mod Melts Glitters and other coloured Mod Melts
When I do photo transfer projects, I find the Brayer and Squeegee from Plaid are essential tools to have. I found the Brayer to be helpful when I was trying to smoothen the decoupage over paper, fabric, and other items on larger surface areas by easily moving it back and forth. It gives the right amount of pressure to eliminate air bubbles that are easy to encounter when doing decoupage. It also minimizes mess, as it is washable with soapy water and air dried. The brayer is made with durable rubber pad and can be hung-up when not in use. I like using the Squeegee on surfaces and corners that are hard to reach and for small spaces.
Once I started exploring and using the photo transfer decoupage, I have found it to be fun and addictive because there are many possibilities on how we can use this to make our crafts special. This liquid decoupage can be used to transfer printed photos and lettering to any surface.
This is how I transferred the photo onto the surface...
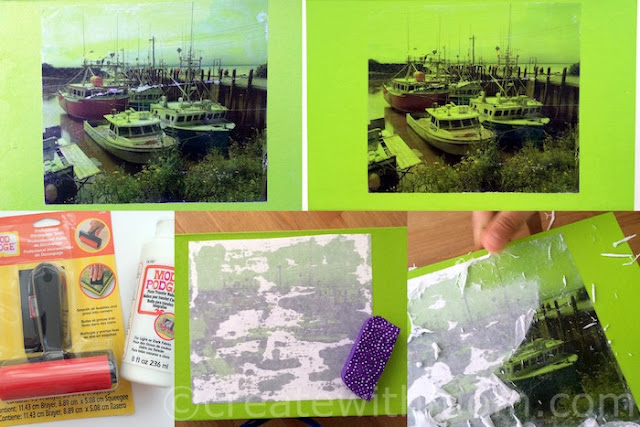
- First, print the photo in good quality ink - colour or black and white onto a low quality paper. Print it mirror image especially if you have writing on it.
- Cut the excess paper out so only the picture you want to transfer remains. Cover the picture entirely with the photo transfer liquid and turn it on to the surface you want to place it on.
- Using the brayer or squeegee make sure to remove the bubbles and excess photo transfer decoupage. I left it to dry overnight.
- Once it dries completely use a damp sponge and the tip of your finger to rub off the paper, this will expose the picture. This takes some patience as it needs to be rubbed back and forth slowly without using too much water or scraping it.
- Use decoupage or any other type of top coat to seal the surface so it protects the transferred photo.
I melted coloured glitter Mod Melts into the Alphabet mold using the Mod Melter for the custom wording that is on this box. The Mod Melter is a unique shaped tool, a little different from a glue gun. The design of the Mod Melter considers the length of the mod melts and the ease of filling Mod Molds.
The tool is used by holding it above the molds in an upright position to fill them with ease. There is a large easy control trigger to press and release the melting glue or mod melt into the molds. I like that the silicone soft grip is easy on the hand, however I did find that when we pass the soft grip the silicone covered tip gets hot, so I didn't find it safe for children to use this Mod Melter. There is an on and off switch indicated by a green light when it is working, however my switch wasn't working smoothly. There is 6 foot electrical cord, which I find useful so we are not restricted.
The only thing I didn't like was when I kept the mod melter horizontally to rest on its built in stand, the glue kept pouring out, and I had to work quick. I recommend making a few shapes using the variety of Mod Podge Mod Melt molds at one time for future projects as well. It takes about 5 to 7 minutes for the glue to get heated and work smoothly. As I switched between different mod melt colours I was able to create blends of unique colours and effects.
We can use the Mod Melter as an all-purpose glue gun to make everything from molded embellishments to home décor, paper crafts, and more. I used the small Plaid scissor that comes in the Mod Podge tool kit to cut off extra parts in the set mold melt shapes and to clean up the edges before mounting the shapes on to the box.
All rights reserved on photographs and written content Createwithmom © 2010 - 2016. Please Ask First


Very creative and it turned out really nice!
ReplyDeletePhoto Transfer decoupage looks like a great way to personalize items. I wasn't aware of the Mod Melter - there are so many interesting gadgets for crafts.
ReplyDeleteLovely...I am not very crafty though
ReplyDeleteThis is such an awesome idea! Very creative.
ReplyDeleteI have never heard of Mod Melts before. What a cool activity to do! Fun way to decorate a travel box too! I hate to pack pics away. Looks great.
ReplyDeleteMy daughter would love to do something like this. For me not so much - she is the crafty one!
ReplyDeleteThis is so creatively funky, I love it!.
ReplyDeleteYou did a beautiful job, it's unique and very creative!
ReplyDeleteThis is a creat and creative craft! Will have to make some with my daughter!
ReplyDeleteI'd like to try Photo Transfer decoupage. It's a nice way to personalize items.
ReplyDelete