We had this DIY stencil wall for about three years now and wanted to change the look of this room by adding more indoor plants. With the indoor plants hanging the wall looked a little crowded, so we changed it up with this easy and fun colour wash technique. Depending on the lighting, this room looks different and beautiful in person.
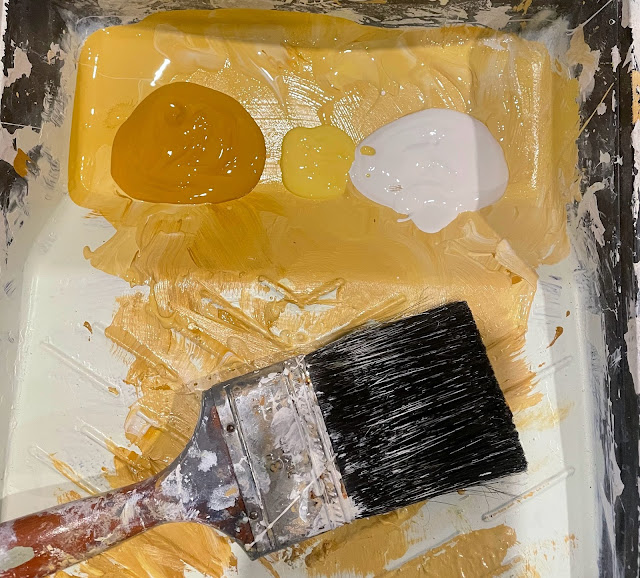
For this quick and easy painting technique we used three different colours of acrylic based paint we had. You can use any type of paint you have in hand to try this. We found it easy to blend the paint using a wide paint brush and do a whole hand movement. We haven't put a top coat on this wall yet, and looking forward to doing this soon.
For this project you will need...
primer or base colour
paint any colour combination you want
3" to 4" wide paint brush
2" wide paint brush
paint tray
painter's tape
top coat glaze
First remove any outlet plates that are on the wall. Then frame the area you want to paint with painter's tape. Use a primer or base colour and paint over the wall.

Pour the colour combinations onto the paint tray, we used a mustard, yellow, and white paint. Dip the brush into the three paints so all the three different colours get individually picked up by the brush without mixing the paints, this will make the colours stand out more. You can use a smaller wide brush and blend it in.
Use a crosshatch motion and overlap the paint to cover the surface. Play around with the paint and blend to get the effect you want.

Once the paint dries completely remove the painter's tape.
Depending on the lighting the look of this wall is different and it brings out the greenery in the room.
All rights reserved on photographs and written content Createwithmom © 2010 - 2021. Please Ask First Please note that all opinions and thoughts expressed are my own.


I've gotta say that I love the blue and white stencil wall
ReplyDeletelol we loved it too but with lots of plants we added in this room it looked crowded so wanted a change
DeleteI love the look of this wall
ReplyDeletethank you
DeleteI like this for an accent wall.
ReplyDeletewow I love the yellow one, sure brightens up the room
ReplyDeleteThis is totally cool,love to try this !
ReplyDeleteNice reno project, it turned out pretty good!
ReplyDeleteI love the looks. Beautiful!
ReplyDeleteI've never seen this technique before
ReplyDeleteThis wall looks amazing with the beautiful plants
ReplyDeleteMaybe this would bring a nice addition to my family room where all my plants are !
ReplyDeleteLooks fabulous and brings some nature touch!
ReplyDeleteI like the colours you used
ReplyDeleteI love the color of this wall
ReplyDeleteI really like the colors you chose !
ReplyDeleteGreat macrame plant holders
ReplyDeleteThe texture of this wall is amazing
ReplyDeleteThis wall looks fantastic !
ReplyDeleteLooks fresh and calm with plants around!
ReplyDeleteYou have great lighting
ReplyDeleteWhat a cool looking idea! Id be nervous Id mess up though!
ReplyDeleteI love the color and the texture of this wall
ReplyDeleteLooks nice and peaceful, like at a nature corner set up!
ReplyDeleteI would like this is grey tones for my house
ReplyDeleteThis wall looks great with the plants
ReplyDeleteLooks absolutely lovely! Love the color!
ReplyDeleteYour plants are so beautiful, love the life of plants
ReplyDeleteIs that a Soider plant ?
ReplyDeleteyes it is a spider plant
DeleteI like how it turned out at the end, nice and pretty!
ReplyDeleteThis must of taken a while to do
ReplyDeleteThe wall goes great with the plants
ReplyDeleteI like spider plants, they are a special addition to a room design!
ReplyDeleteThe wall looks amazing
ReplyDeleteI love the colors you chose - it looks wonderful and cheery!
ReplyDelete